Learning basic soldering skills
Objectives
At the end of this self-learning lab, you should be able to:
- learn basic soldering skills
Materials
- Soldering iron
- Solder wire
- Soldering iron stand
- Flux
Soldering iron
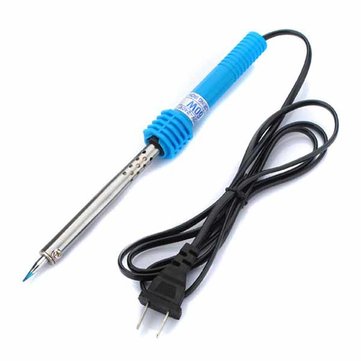
- It supplies heat to melt solder so that it can flow into the joint between two workpieces.
- A soldering iron is composed of a heated metal tip and an insulated handle. Heating is often achieved electrically, by passing an electric current (supplied through an electrical cord or battery cables) through a resistive heating element.
- Tinning
- Melt a little solder on the tip of the iron, which help the heat flow from the iron's tip to the joint.
- But don't try to wipe solder from the tip to the joint directly, this will cause cold solder joint.
Solder wire
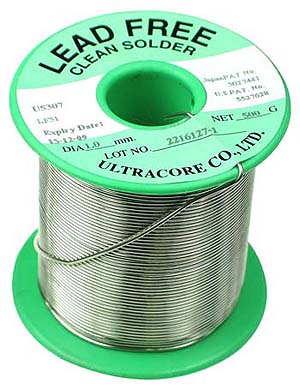
- Solder is a fusible metal alloy used to create a permanent bond between metal workpieces.
- Typically has a melting between 180 and 190 °C
- Solder used here in M2 is 60/40 or 63/37 Sn-Pb, which is toxic
- Usually solder wire has a core containing flux
Soldering iron stand
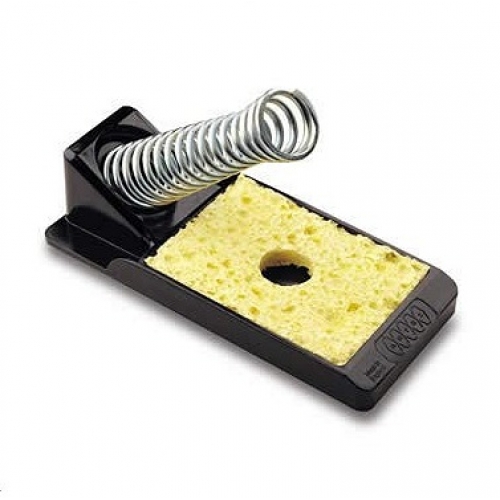
- A soldering iron stand keeps the iron away from flammable materials.
- often comes with a sponge for cleaning the tip. Sponge should be dampened but not dripping wet, as too much water will cool down the soldering iron and tip can not be cleaned effectively.
Flux
Further Reading: Flux (metallurgy) - Wikipedia
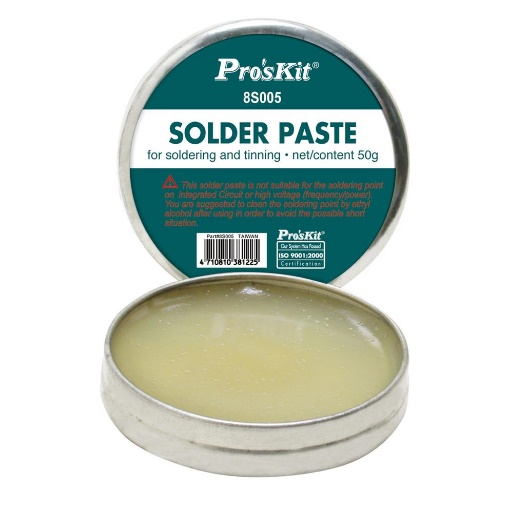
- use to remove oxidized metal and wet the surface to facilitate soldering.
- usually made of rosin. (smelting flux is acidic which should not be used in soldering)
- as solder wire already as rosin core, usually no additional flux is required when soldering through-hole components.
- should be cleaned after the soldering process using a organcic solvent (potentially including chlorofluorocarbons), as flux is slightly corrosive and may conduct electricity.
- Prolonged exposure to rosin fumes released during soldering can cause occupational asthma. Thus, remember to open a smoke absorber or a fan when you use it.
Safety precautions
Safety precautions
- Never touch the element or tip of the soldering iron.
- They are very hot (about 350°C) and will give you a nasty burn.
- Take great care to avoid touching the mains flex with the tip of the iron.
- The iron should have a heatproof flex for extra protection. An ordinary plastic flex will melt immediately if touched by a hot iron and there is a serious risk of burns and electric shock.
- Always return the soldering iron to its stand when not in use.
- Never put it down on your workbench, even for a moment!
- Work in a well-ventilated area.
- The smoke formed as you melt solder is mostly from the flux and quite irritating. Avoid breathing it by keeping you head to the side of, not above, your work.
- Wash your hands after using solder, as solder contains lead which is a poisonous metal
First Aid for Burns
Immediately cool the affected area under gently running cold water.
- There is a water bucket near soldering station in M2, but no one knows whether the water is clean…
- Go downstairs, turn right, and you'll see a water tap on the right hand side of the dangerous chemcial warehouse.
Procedures
Preparing the soldering iron
- Place the soldering iron in its stand and plug in.
- Turn on and set the temperature of the the soldering iron. The Optimal temperature depends on the material of the solder wire, the contact area betwwn the soldering iron and the object being soldered, and the rate of heat dissipation. Starts with 330°C as a rule of thumb.
- The iron will take a few seconds to reach its operating temperature.
- You can check if it is ready by trying to melt a little solder on the tip.
Start soldering
- Hold the soldering iron like a pen, near the base of the handle.
- Touch the soldering iron onto the joint to be made.
- Make sure it touches both the component lead and the track. Hold the tip there for a few seconds and feed a little solder onto the joint.
- Apply the solder to the joint, not the iron.
- Remove the solder, then the iron, while keeping the joint still.
- Allow the joint a few seconds to cool before you move the circuit board.
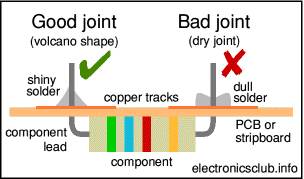
- Good soldering joint should should look shiny and have a 'volcano' shape. If not, reheat and feed in a little more solder. A 'bad' joint (a.k.a. a cold joint) conduct poorly and cracks may develop in the joint over time.
Before leaving
- clean tip with dampened sponge or tip cleaning brass
- apply a small amount of fresh solder on the tip These can prevent the soldering iron from oxidizing.
Further reading (videos)
You should learn more about soldering by watching the following videos.
The first video is good. The second video is lengthy. The third video is good too. The fourth video is not as good as the first one, but he teaches desoldering.
Section Check Box:
- Soldering iron
- Solder
- Soldering iron stand
- Flux
Assignment 01
Soldering Blue Pill
- The Blue Pill we have given you has one side of the pin headers soldered only. Try to solder pin headers on the other side.
Desoldering
There are several methods for desoldering:
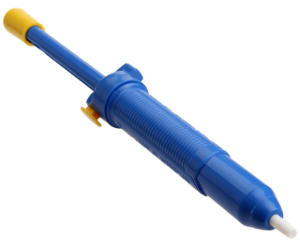
- Desoldering pump
- Heat the joint up with soldering iron, and then use desoldering pump to suck the solder back.
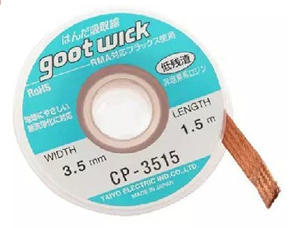
- Solder Wick
- Apply both the wick and the tip of soldering iron to the joint ,and then wait until the solder melts and flow onto the wick.
- Hot air gun
- Usually used for Surface-Mount Device (SMD).
- Use some FORCE: Quick, nice, clean, but may damage the board
- Hold the board that having the solder joint with tweezers or pilers. (or bare hand if you like)
- Heat the joint up with soldering iron until it melts.
- Knock the table with the tweezers or pilers (or bare hand if you like) hard and quickly.