Assignment 1. Manual Controller with m2_ps4
Info
To complete this assignment, you should have completed:
- Lab 5.1. ROS Topics in Python
- Lab 5.2. ROS Services in Python
- Lab 5.3. ROS Package, msg, srv
Motivation
Objective: Control a simulated robot on your computer with a joystick
- In M2, one of the programmer tasks each year is to write a PS4 controller node that can allow us to drive the robot and give commands to tell it to perform different tasks.
- In this assignment, you will write a node to control the movement of a simple simulated robot (the turtle) using a PS4 controller connected to your machine.
- You will also learn how to use our m2_ps4 library.
Background. What is the turtle?
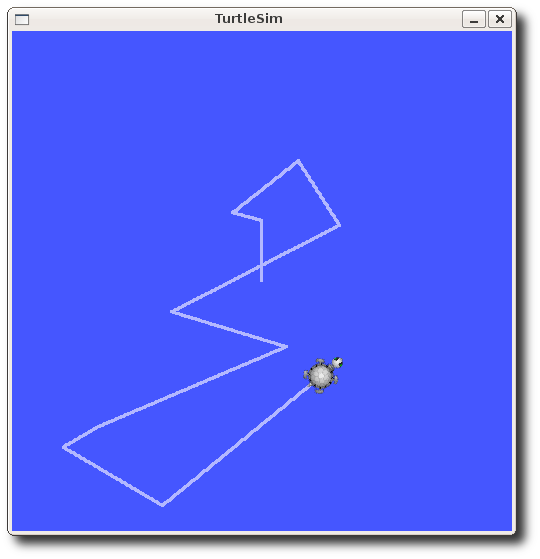
The "turtle" is the name for the simulated robot. This simulator is maintained by the ROS organization, the documentation is here: http://wiki.ros.org/turtlesim?distro=noetic
The above interface is running inside a simulator node called turtlesim_node.
Running the turtle
To run the turtlesim_node, run rosrun turtlesim turtlesim_node, and the above window should pop up.
The turtlesim package also includes a keyboard-based controller. To run it, in a new terminal, run rosrun turtlesim turtle_teleop_key.
# on a separate terminal
$ rosrun turtlesim turtlesim_node
# on a separate terminal
$ rosrun turtlesim turtle_teleop_key

...(omitted)
Reading from keyboard
---------------------------
Use arrow keys to move the turtle.
- Now you can use the arrow keys of the keyboard to drive the turtle around. If you cannot drive the turtle, select the terminal window of the turtle_teleop_key to make sure that the keys that you type are recorded.
Topics provided by turtlesim
The turtlesim_node receives velocity instructions via the topic /turtle1/cmd_vel. Try to use rostopic echo on a new terminal to see how the messages are interpreted when you are using the keyboard controller.
$ rostopic echo /turtle1/cmd_vel
linear:
  x: 2.0
  y: 0.0
  z: 0.0
angular:
  x: 0.0
  y: 0.0
  z: 0.0
---
linear:
  x: 2.0
  y: 0.0
  z: 0.0
angular:
  x: 0.0
  y: 0.0
  z: 0.0
---
- The topic type can be obtained via
rostopic type [topic]orrostopic info [topic].
$ rostopic type /turtle1/cmd_vel
geometry_msgs/Twist
However, in this assignment, we will not be using the keyboard controller which only provides discrete driving controls. We will make our own PS4 controller node that has much more features!
m2_ps4 Dualshock 4 ROS driver

We often use the DS4 (DualShock 4, the model of the PS4 controller) for manual input.
To use the DS4 in ROS, we usually use the m2_ps4 package.
Installation instructions
$ cd ~/catkin_ws
$ git clone [email protected]:m2robocon/m2_ps4 src/m2_ps4
$ catkin_make
The catkin_make command installs our PS4 config files to your system,
which requires root privilege.
You may be prompted to type your sudo password.
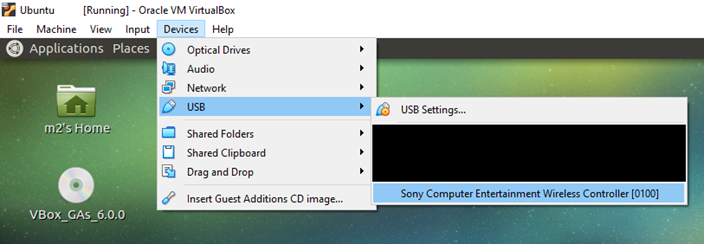
Connect the DS4 to your computer
You can connect the DS4 to your computer with these 2 methods, wired or wireless:
Plug a USB cable from your computer to the DS4. If you are on a virtual machine, you might need to add the USB device to your virtual machine:
If you are on a virtual machine, add the physical Bluetooth adapter to your virtual machine first (it varies for each machine). To establish the connection, refer to the instructions on the m2_wiki: https://github.com/m2robocon/m2_wiki/wiki/udev-rules#connect-the-ps4-controller-via-bluetooth
After you connect the DS4, you should see the device name under the /dev directory:
$ ls /dev | grep ds4
ds4red
ds4red_tpad
ds4red_ff
The word red may be changed to other names depending on the controller you chose.
Topics provided by m2_ps4
There are many features in the m2_ps4 package, but the most important thing you should note is how to launch the ROS nodes to get the DS4 input published:
- After the DS4 is connected (via wired or wireless), on a new terminal, run
roslaunch m2_ps4 ps4_msg.launch joy:=/dev/ds4red- Replace
ds4redwith the device name in the previous step. - The meaning of
roslaunchwill be taught in lab 5.4. Basically, it allows us to run a few nodes at once with one single command.
- Replace
- By default, DS4 data is published on the
input/ps4_datatopic. Try to userostopic echoon a new terminal to see the message format when you are pressing buttons / moving input joysticks on the DS4.
$ rostopic echo input/ps4_data
hat_lx: 0.0
hat_ly: 0.347806990147
l2_analog: 0.0
hat_rx: 0.0
hat_ry: 0.0
r2_analog: 0.0
dpad_x: 0.0
dpad_y: 0.0
cross: True
circle: True
triangle: False
square: False
l1: True
r1: False
l2: False
r2: False
share: False
options: False
ps: False
l3: False
r3: False
tpad_click: False
- The topic type can be obtained via
rostopic type [topic]orrostopic info [topic], similar to the previous section.
$ rostopic type input/ps4_data
m2_ps4/Ps4Data
If you can display the message contents for both components (turtlesim, DS4), then you can start doing the actual assignment!
Required functionalities of your controller
Refer to the PS4 User's Guide for the names of different buttons: (https://manuals.playstation.net/document/en/ps4/basic/pn_controller.html) You should write a controller node, which provides the following functions:
-
Basic driving
- Your controller should be able to complete the basic functionality of the vanilla keyboard controller. In other words, your controller can be used to make the turtle: go forwards, backwards, turn left, turn right.
- Requirement: When the left stick is pushed up/down, the turtle should move forwards/backwards with variable speed based on the magnitude of push.
- Requirement: When the right stick is pushed left/right, the turtle should turn anticlockwise/clockwise with variable speed based on the magnitude of push.
-
Velocity scale modification
- The relative velocity magnitude from the sticks should be able to be changed.
- This means, if your mapping from the magnitude of the left stick (let it be \(x\)) and the velocity of the turtle (let it be \(v\)) is \(v = x \cdot k\), where \(k\) is some constant, then the value of \(k\) should be able to be changed via controller input.
- Requirement: When the "up"/"down" directional button is pressed, the controller should be more/less "aggressive" such that pushing the stick gives higher/lower velocity than before (in the example, \(k\) increase/decrease).
- There should be exactly 5 discrete levels of "aggressiveness".
-
Clear background
- Notice that when the turtle is moving, it leaves a pen trail.
- Requirement: When the "ps" key is pressed, the trail should be cleared.
- Refer to the turtlesim documentation (http://wiki.ros.org/turtlesim?distro=noetic) to see which service is to be called.
-
Change pen color
- The pen trail color can actually be changed to different RGB color.
- Requirement: When the △/○/×/□ button is pressed, the trail color should change to green/red/blue/purple respectively.
- Refer to the turtlesim documentation (http://wiki.ros.org/turtlesim?distro=noetic) to see which service is to be called.
Template package
Where do I get even started with this assignment… there are so many tasks…
To help you, we have provided you with a template package, and you can work on the controller node directly!
- Inside
m2cs_ros_tutorial, you should see a package namedturtle_ps4. - The node that you should be working on is
turtle_ps4/src/ps4_controller.py. You do not need to modify the contents inturtlesim,m2_ps4or other files inturtle_ps4! - If you are lost, there are some "blanks" and hints in the file that you can fill in to complete the assignment.
Assignment evaluation/testing procedures
This part describes how your assignment submission will be evaluated by the trainers, which also gives hints on how you can test your program while developing it.
- The trainer's machine will have
m2_ps4,turtlesimand theturtle_ps4template installed as described at the background part of this assignment. A physical DS4 will be connected (via wired or wireless). - The trainers will replace
ps4_controller.pyinturtle_ps4/srcwith your submitted version. - The trainers will run the command
roslaunch turtle_ps4 test.launch.ds4redinturtle_ps4/launch/test.launchwill be replaced accordingly. This command runs turtlesim_node, launches ps4_msg.launch, and runs your file ps4_controller.py. - The trainers will test the features stated in "Required functionalities of your controller" one by one.
- The trainers will read your source code to check your implementation skills and coding style. You are encouraged (but not required) to discuss with other trainees, but we require you to write your own code (no plagiarism!).
Submission instructions
- Create a Github account if you don't have
- Fork this training repository: https://github.com/m2robocon/m2cs_ros_tutorial
- Git clone this repository to your local machine
- Commit your work in local and push to Github
Warning
We will start marking your assignments after the deadline, so make sure it is pushed!